The purpose:
Every company needs a way to onboard their employees in their VPN to let them use all the internal services. So, we built a VPN manager that is,
- Zero config
- Multi-Node
- Fault tolerant
- Automatic Fail over
- Platform independent (windows, Linux, MacOS)
And the services we have are,
- Self hosted SSO(Keycloak which is an identity provider for openID Connect)
- VaultWarden(Self hosted password manager)
- Gitlab(for internal use cases)
- DNS server(for internal domain name resolution)
The flow of the VPN manager:
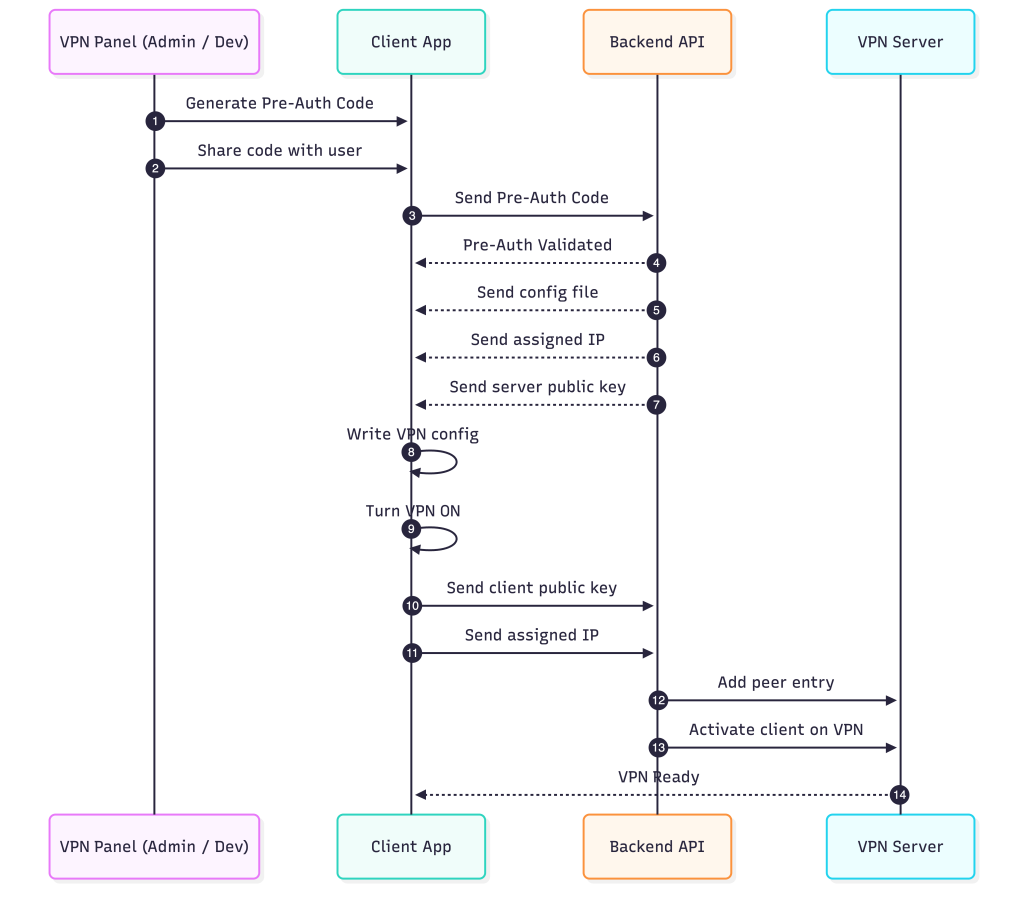
This section explains the complete lifecycle of how a new client is onboarded into the VPN using a pre-authentication flow. The goal is to keep the process simple for users while ensuring that the backend has full control over authentication, configuration, and peer activation.
1. Creating Users and Generating Pre-Auth Codes
The process begins in the VPN panel, where an admin adds a new user(either admin or developer). The internal access changes from admin to developer. Once the user entry is created, the panel generates a unique pre-authentication code. This code is intended to be shared with the user through any secure channel. The code acts as the temporary credential required for the device to authenticate for the first time.
2. Client Authentication Using the Pre-Auth Code
On the user’s device, the client application prompts for the pre-auth code. When the user enters it, the client sends the code directly to the backend API. The backend checks whether the code is valid and unused. If the validation succeeds, the onboarding process continues. If the code is invalid or already used, the onboarding flow stops.
3. Backend Returns the Required Configuration
After successful validation, the backend prepares the initial VPN configuration for the client. This includes the assigned IP address for the client, the server’s public key, and the WireGuard or tunnel configuration file. These values are sent back to the client application.
4. Client Applies the Configuration Locally
The client application writes the received configuration to the system, sets up the interface, and turns the VPN on. At this stage, the client generates its own key pair if required and completes the local setup process.
5. Client Sends Its Keys Back to the Backend
Once the VPN is activated on the client side, the application sends two important pieces of information back to the backend: the client’s public key and its assigned IP address. This allows the backend to formally register the client as a peer.
6. Backend Adds the Client as a Peer on the VPN Server
The backend forwards the client’s public key and IP to the VPN server. The server creates a peer entry and activates it, enabling the client to fully join the VPN network. When the server finishes this step, the VPN connection is fully established and the client can begin encrypted communication.
Tech stack:
Golang
The backend is written in Go. It handles the API endpoints, pre-authentication logic, configuration generation, and communication with the VPN server. Go’s concurrency model and standard library make it well suited for building fast and predictable network services. The entire onboarding flow, from receiving the pre-auth code to delivering the WireGuard configuration, is implemented in Go.
WireGuard

WireGuard is the VPN technology used for tunneling. It provides a small, modern, and secure protocol with minimal overhead. The backend generates the client configuration, assigns the IP address, and prepares the server’s side of the peer. On the client side, the application receives the configuration and brings up the interface to establish the encrypted tunnel.
iptables

iptables is used on the server to route packets between the WireGuard interface and the internal network. It ensures that traffic from clients is forwarded correctly and that the necessary firewall rules are applied. This allows each connected client to communicate through the VPN in a controlled and secure manner.
iptable rules:
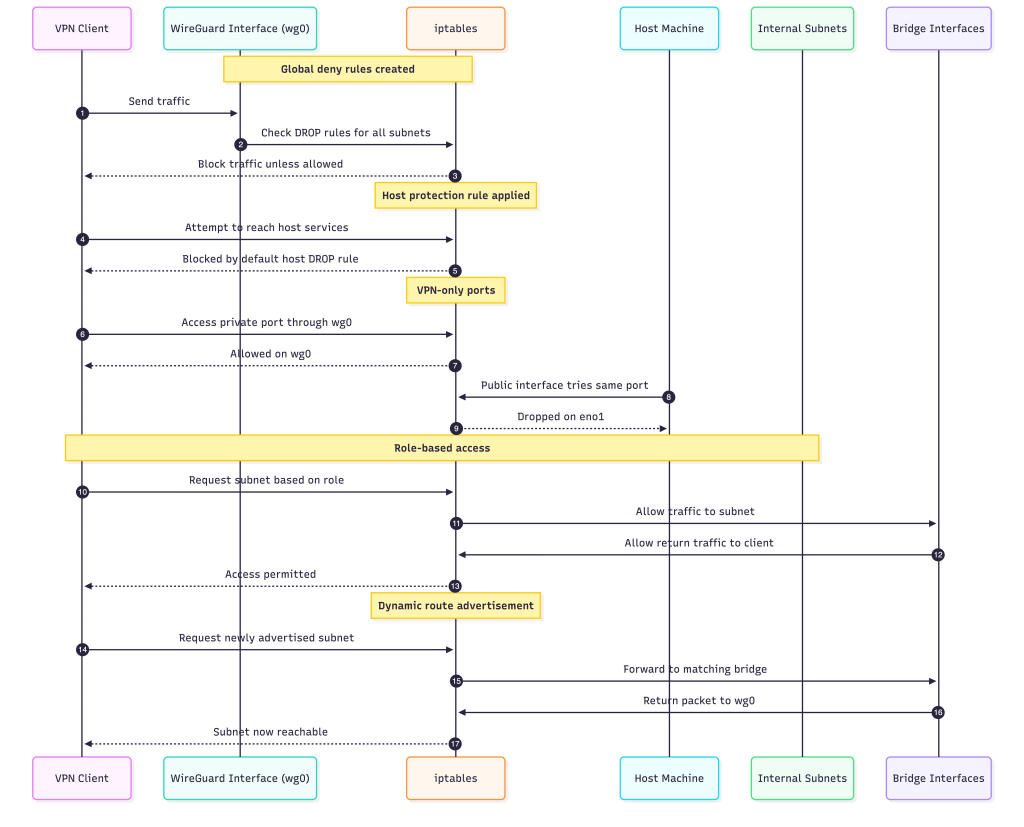
The VPN manager uses iptables to control how every user interacts with the internal network. The idea is simple: nothing is allowed by default, and all access is explicitly granted based on the user’s role and the subnets they are permitted to reach.
Global Deny Model
When the VPN starts, the system inserts a set of DROP rules that block all outgoing traffic from WireGuard clients unless another rule allows it.
-i wg0 -s 10.0.0.0/24 -d 172.17.0.0/16 -j DROP
-i wg0 -s 10.0.0.0/24 -d 172.19.0.0/16 -j DROP
-i wg0 -s 10.0.0.0/24 -d 0.0.0.0/0     -j DROP
This creates a strict boundary. Nothing leaves the VPN interface unless the firewall says so.
Protecting the Host Machine
The host itself is also protected. A default DROP rule ensures that VPN users cannot reach host services unless specifically allowed.
-i wg0 -s 10.0.0.0/24 -j DROPThis prevents accidental exposure of SSH, Docker ports, or system daemons.
VPN-Only Ports
Some services should be reachable only through the VPN. The -a and -r commands manage these rules.
Allow access from VPN:
-i wg0 -p tcp --dport <port> -j ACCEPTBlock access from the public interface:
-i eno1 -p tcp --dport <port> -j DROPRole-Based Access
Each user is assigned a role, and their IP is granted access to specific subnets.
Developers get:
10.0.0.0/24Admins get:
10.0.0.0/24
172.19.0.0/16
For each allowed subnet, the system allows both directions of traffic between wg0 and the corresponding bridge.
Client to subnet:
-i wg0 -o <bridge> -s <client_ip>/32 -d <subnet> -j ACCEPTSubnet to client:
-i <bridge> -o wg0 -s <subnet> -d <client_ip>/32 -j ACCEPTHost access for internal services:
-i wg0 -s <client_ip>/32 -d <subnet> -j ACCEPTThis creates isolated access paths per user.
Dynamic Route Advertisement
New internal networks can be added at runtime without restarting anything.
When a subnet is advertised, iptables inserts:
Permit access:
-i wg0 -s 10.0.0.0/24 -d <subnet> -j ACCEPTForwarding paths:
wg0 → <bridge>
<bridge> → wg0
This allows the admin to expose additional internal networks instantly.
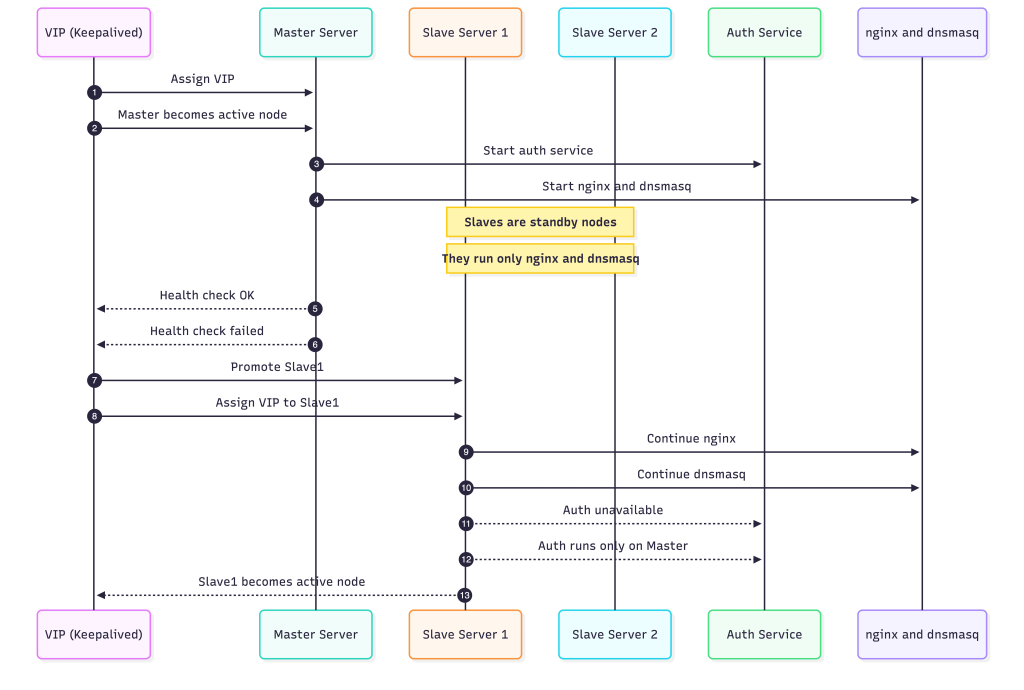
Multi-Node setup:
The system runs in a multi-node configuration where one machine acts as the master and the others remain on standby as slave servers. All of them participate in a shared high-availability group, but only one server at a time controls the virtual IP address (VIP). The VIP is the single entry point for all clients and is managed by Keepalived.
As long as the master is healthy, it owns the VIP. This server does the most work: it runs the authentication service and also handles nginx and dnsmasq. Because nginx and dnsmasq are stateless, the slave servers also run them, but they stay idle until the master goes down.
The slave servers continuously monitor the master through Keepalived’s health-check mechanism. If the master becomes unreachable, the VIP instantly moves to the highest-priority slave. That server immediately becomes the new active node. Since nginx and dnsmasq are already running on every slave, they start serving traffic without needing any extra setup. The only part that does not move is the authentication service, which is intentionally bound to the master. This keeps the system simple and avoids data-consistency issues across nodes.
Once the VIP switches over, clients automatically start hitting the new active server, and the VPN network continues functioning without interruption. The transition is seamless from the client perspective, and the system remains available even through node failures.
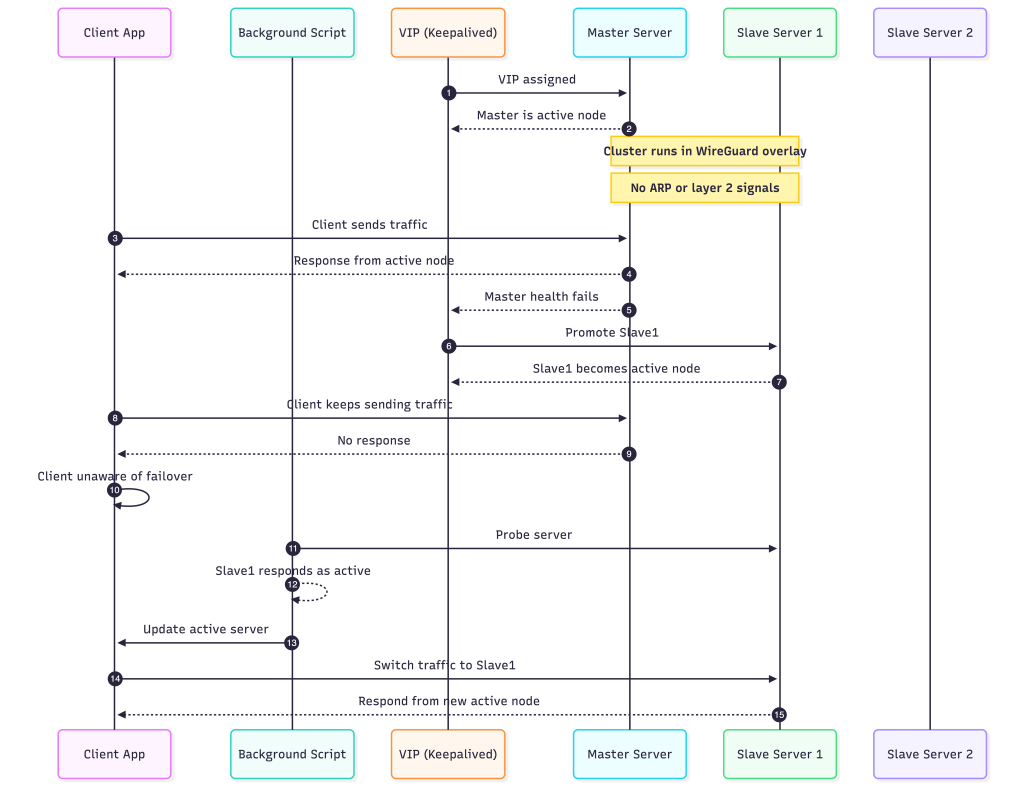
Challenges with multi-node:
- The servers are not in the same physical LAN.
The entire cluster lives inside a WireGuard overlay, which means the nodes never share a real layer-2 network. Everything they see is already encapsulated. - Traditional VIP failover signals do not exist.
In a physical LAN, a VIP change is easy for clients to detect because ARP tables update and MAC ownership shifts. WireGuard has none of this. There is no ARP, no broadcast, and no layer-2 behavior for clients to rely on. - Clients cannot automatically discover the new active node.
When the master fails and a slave takes over the VIP, nothing tells the client about it. From the client’s view, the VIP still points to the old node, even though it is no longer serving. - Failover appears to work inside the cluster, but not from the client side.
Keepalived can switch the VIP instantly between nodes, but since the overlay hides L2, only the servers know about it. Clients remain unaware unless something explicitly informs them. - The solution is to make failover detection client-driven.
The VPN client runs a background script that periodically checks which server currently responds as the active one. It performs small probes and adjusts itself based on the responses. - The client updates its target server dynamically.
As soon as the script detects that a different node has become active, the client switches over and starts sending traffic to the correct server. This restores the behavior normally provided by layer-2 networks.
Network connectivity issue:
The VPN worked perfectly everywhere until I connected through my mobile hotspot. As soon as I switched to that network, everything slowed down. Requests still reached the backend, but the user interface never loaded properly. Static files such as JavaScript and CSS either took minutes or did not show up at all. When I moved back to office WiFi, everything worked immediately. So the issue was limited to the hotspot path.
Nothing in my configuration changed. WireGuard was active, routing was correct, and DNS worked. The only thing that differed was the network between the client and the server. That pointed directly at MTU.
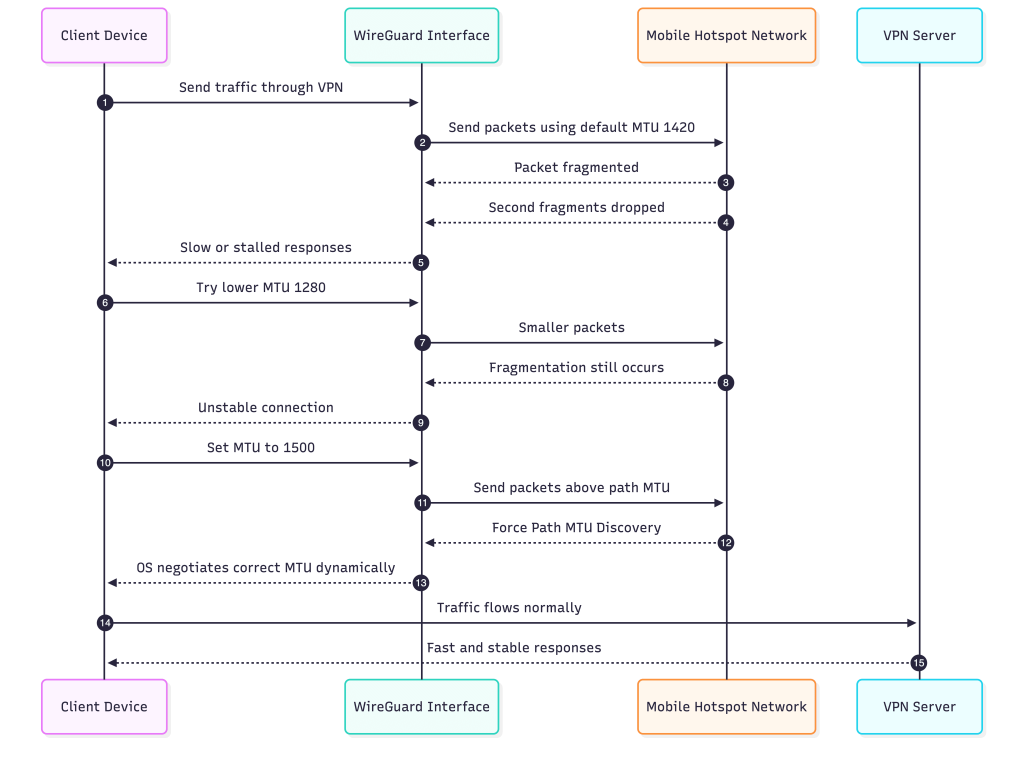
Mobile networks usually operate with smaller path MTUs compared to broadband. WireGuard uses 1420 bytes by default. On the hotspot this value turned out to be too high. The packets still left the client, but they were being fragmented by the hotspot network. This would normally be fine, except that many carriers silently drop the second fragment. The result was a connection that looked alive but could not deliver anything useful to the application.
I tried reducing the MTU to 1280, which is a common suggestion. It did not fix the issue. Fragmentation still occurred somewhere along the path, and the performance barely improved. The hotspot continued to stall.
The actual fix went in the opposite direction. Instead of lowering the MTU, I increased it to 1500. Once I did that, the operating system detected that this value did not match the real path MTU and triggered proper Path MTU Discovery. At that point the system started negotiating the correct MTU dynamically. The traffic stopped fragmenting in the hotspot, and the connection instantly became fast and reliable.
When I switched back to the office network, both 1420 and 1500 worked correctly. That confirmed the difference in behaviour between mobile hotspots and regular WiFi. The hotspot was the environment that could not handle fragmented packets properly. Allowing the OS to perform MTU discovery instead of forcing WireGuard to use a guessed value solved the issue completely.
It was not the solution I expected, but it was the one that finally made the VPN stable in every network I tested.
Conclusion
Unified access path
The VPN manager gives the team one consistent way to enter the internal network, which removes guesswork and avoids scattered access methods.
Private-by-default internal tools
Services that were never meant to be public stay inside the VPN, yet developers can reach them easily from any location.
Safer Credentials with Vaultwarden
Vaultwarden benefits directly from the private network. Only authenticated VPN users can open it, which reduces exposure and keeps sensitive data protected.
Faster onboarding
New team members receive a single pre-auth code and gain controlled access to all internal tools, with no complicated setup.
Simpler troubleshooting
When all traffic flows through one secure path, issues are easier to observe, reproduce, and fix.
Consistent experience across networks
The team connects the same way on home WiFi, office WiFi, or mobile networks. This provides a stable working environment everywhere.
Stronger security without extra friction
Internal services gain a meaningful security boundary while the day-to-day developer experience stays smooth and predictable.